ディーバ Blog

大阪発 C#の会社、株式会社ディーバの Blog です。

Xamarin.Android SfDataGrid 改行でセルの編集を確定する

Syncfusion SfDataGrid のセル編集をキーボードの改行(Enter/Return キー)で編集を確定する方法です。

※ この記事の投稿時点の SfDataGrid のバージョンは v15.2.0.46 です。

f:id:jz5_diva:20170721211019j:plain

Editing 機能で Excel のセルのように編集できます。改行をハンドリングするには、CurrentCellBeginEdit イベントで処理します。

// _dataGrid: SfDataGrid
_dataGrid.CurrentCellBeginEdit += DataGrid_CurrentCellBeginEdit;
private async void DataGrid_CurrentCellBeginEdit(object sender, GridCurrentCellBeginEditEventArgs args)
{
    await Task.Delay(100);

    if (!(args.Column is GridTextColumn)) return;

    var row = _dataGrid.GetRowGenerator().Items.FirstOrDefault(x => x.RowIndex == args.RowColumnIndex.RowIndex);
    var column = (row.GetType().GetRuntimeProperties().FirstOrDefault(x => x.Name == "VisibleColumns").GetValue(row) as List<DataColumnBase>).FirstOrDefault(x => x.ColumnIndex == args.RowColumnIndex.ColumnIndex) as IElement;

    if ((column.Element as ViewGroup).ChildCount > 0)
    {
        var editView = (column.Element as ViewGroup).GetChildAt(0) as EditText;
        if (editView != null)
        {
            editView.SetOnEditorActionListener(this);
            editView.SetImeActionLabel("Done", ImeAction.Done);
            editView.SetSingleLine(true);
        }
    }
}

5/23 MvvmCross 5.0 がリリース

クロスプラットフォーム MVVM フレームワーク「MvvmCross」がメジャーアップデートして MvvmCross 5.0 がリリースされています。MvvmCross 5.0 は、Xamarin.iOS, Xamarin.Android, Xamarin.Mac, Xamarin.Forms, Universal Windows Platform (UWP), Windows Presentation Framework (WPF) をターゲットとしています(Windows Phone 8.x, Windows 8.x が削除されました)。

f:id:jz5_diva:20170523023535p:plain

少人数で開発されていることもあり 4.x 系のアップデートはもうないと思われます。これから開発する場合 5.x 系を選ばない理由はないでしょう。当ブログも含めて 4.x 系以下の情報は古く 5.0 ではまったく異なる場合があるので最新の情報を確認しましょう。

所感としては、4.x 系と大きく異なっていますが(ようやく便利になった感じ)、そのままアップデートしてもある程度動くと思います。実際 iOS/Android のプロジェクトを先日から 5.0 beta にアップデートする作業をしていました。Navigation(画面遷移と画面間の値の受け渡し)などの作法は全く異なりますが、4.x 系の作法でも動くので少しずつ変更しています。

MvvmCross 5.0

詳しくは、MvvmCross 5.0 release! を参照してください。

以下、気になったところだけピックアップ。

Navigation

もう ShowViewModel は使いません(フレームワーク内部では使っています)。新しい NavigationService を使って、画面遷移します(ViewModel 間でやり取りします)。特に次の2点は大きいですね。

  • ViewModel へ渡すパラメーターが typesafe になりました。
  • ViewModel から戻り値も受け取れるようになりました。

詳しくは、Navigation を参照。

Lifecycle

ViewModel で、View のライフサイクル イベント起点で簡単に処理が記述できるようになっています。ViewModel に次のメソッドが追加されています。

void Appearing();
void Appeared();
void Disappearing();
void Disappeared();

iOS presenter

iOS 用の presenter が改善されています。これまで Modal 表示など View をどのように表示するかを presenter クラスにごりごり記述していましたが、デフォルトである程度使える presenter が実装されています。

例えば、View クラスに MvxModalPresentation 属性を付けるだけで Modal 表示になります。

活用するには、ドキュメントおよびサンプル、そして実装された Presenter のコードも参照する必要があると思います。

ちなみに Android の presenter 改善は MvvmCross 6.0 予定です。

MvvmCross 6.0

既に MvvmCross 6.0 のロードマップも公開されています。

  • Even better Xamarin.Forms support
  • A new default presenter for Android
  • Better handling of Fragments

さらに、.NET Standard 2.0 サポートも含まれています。プラグインの構造の見直しや、より async/await や C# 7 の使用も。

ロードマップの議論は MvvmCross roadmap · Issue #1415 · MvvmCross/MvvmCross でされています。

Android カメラ API でフロント/バックカメラ画像を同時に表示

Android のフロント/バックカメラを同時にアクセスする方法です。結論は Android 4 ではできたようで 5.0 (Lollipop) からできなくなっている(?)ようです。

Android の カメラ API は、新旧2種類あります。

Camera

旧 Camera API では、実際にされている方がいて、同時に両方のカメラ映像を表示するデモとソースコードが公開されています。

www.youtube.com

bitbucket.org

ただし、Android 5 で実行すると Camera.Open のところで Fail to connect to camera service の例外が出ます。Bitbucket のプロジェクトの Issue にそのような コメント もあります。

Camera2

新しい camera2 API で試してみると、CmeraManage.openCamera で2台目にアクセスすると MAX_CAMERAS_IN_USE エラーが発生します。

複数の Android 端末で試しましたが同じ結果。もしかすると機種によっては可能なものもあるかもしれませんが、Android OS で拒否されているのかも。

Galaxy シリーズには、デュアルカメラアプリがあり、標準カメラアプリではもちろん同時撮影できますが、試したコードは同様にエラーとなりました。

操作ガイド

Xamarin.Android で interface を実装するとき Handle と Dispose の実装

Xamarin.Android で Listener などの interface を実装しようとしたとき、Handle プロパティと Dispose メソッドを実装する必要があります。

class SampleListener : AppBarLayout.IOnOffsetChangedListener
{
    public IntPtr Handle => throw new NotImplementedException();

    public void Dispose()
    {
        throw new NotImplementedException();
    }

    public void OnOffsetChanged(AppBarLayout appBarLayout, int verticalOffset)
    {
        throw new NotImplementedException();
    }
}

これは Java.Lang.Object を継承すれば解決します。

class SampleListener : Java.Lang.Object, AppBarLayout.IOnOffsetChangedListener
{
    public void OnOffsetChanged(AppBarLayout appBarLayout, int verticalOffset)
    {
        throw new NotImplementedException();
    }
}

MvvmCross + Xamarin.Android でスプラッシュスクリーンを表示

MvvmCross (現在 v4.14)をセットアップした Xamarin.Android プロジェクトは、はじめからスプラッシュスクリーンが実装されています。

ただ、セットアップ時に配置されている splash.png を差し替えただけでは、Android 画面比率に合わせて画像がゆがんで表示されてしまうため、正しく表示できるよう修正します。

初期状態

はじめに、スプラッシュスクリーンに関するファイルは次の通り。

  • SplashScreen.cs
  • Resources/drawable/splash.png
  • Resources/layout/SplashScreen.axml
  • Resources/values/SplashStyle.xml

MvxSplashScreenActivity を継承した SplashScreen クラスが最初に呼び出されます。ここで SplashScreen.axml にある Theme.Splash スタイルと、SplashStyle.xml 画面を指定しています。

namespace MapApp.Droid
{
    [Activity(
        Label = "Sample"
        , MainLauncher = true
        , Icon = "@mipmap/icon"
        , Theme = "@style/Theme.Splash"
        , NoHistory = true
        , ScreenOrientation = ScreenOrientation.Portrait)]
    public class SplashScreen : MvxSplashScreenActivity
    {
        public SplashScreen()
            : base(Resource.Layout.SplashScreen)
        {
        }
    }
}

SplashStyle.xml で、splash.png を背景として指定しています。

<resources>
  <style name="Theme.Splash" parent="android:Theme">
    <item name="android:windowBackground">@drawable/splash</item>
    <item name="android:windowNoTitle">true</item>
  </style>
</resources>

SplashScreen.axml では、Loading... のテキストを表示するよう記述しています。

<LinearLayout xmlns:android="http://schemas.android.com/apk/res/android"
    android:orientation="vertical"
    android:layout_width="fill_parent"
    android:layout_height="fill_parent">
    <TextView
        android:layout_width="fill_parent"
        android:layout_height="wrap_content"
        android:text="Loading...." />
</LinearLayout>

アプリを起動すると、splash.png が表示され、続いて SplashScreen.axml のテキストが表示されます。

問題点

splash.png が、画面比率に合わせてゆがんで表示されます。

9-patch 画像に置き換えても、SplashScreen.axml のテキストが表示されるときに背景画像がゆがみます。

解決策

SplashStyle.xml で指定する背景を、画像ファイルではなく、次のような xml ファイルに変えます。

SplashLayer.xml という名前で drawable フォルダーに保存します。

<?xml version="1.0" encoding="utf-8"?>
<layer-list xmlns:android="http://schemas.android.com/apk/res/android">
  <item>
    <shape
        android:shape="rectangle">
      <solid
          android:color="@color/primary" />
    </shape>
  </item>
  <item>
    <bitmap
          android:gravity="center"
          android:src="@drawable/splash" />
  </item>
</layer-list>

SplashStyle.xml を編集し、@drawable/splashlayer を指定します。

<resources>
  <style name="Theme.Splash" parent="android:Theme">
    <item name="android:windowBackground">@drawable/splashlayer</item>
    <item name="android:windowNoTitle">true</item>
  </style>
</resources>

以上です。

Xamarin.Android の Google Maps でカスタムした情報ウィンドウの表示

Xamarin.Android の Google Maps で、独自の情報ウィンドウ (info Window) を表示します。

Google Maps の表示 はこちらから。

カスタムした情報ウィンドウの表示

View の定義

axml ファイルで定義した View を情報ウィンドウとして表示します。

<?xml version="1.0" encoding="utf-8"?>
<LinearLayout xmlns:android="http://schemas.android.com/apk/res/android"
    android:orientation="horizontal"
    android:layout_width="match_parent"
    android:layout_height="match_parent">
    <ImageView
        android:layout_gravity="center_vertical"
        android:src="@drawable/ic_train_black"
        android:layout_marginTop="8dp"
        android:layout_marginBottom="8dp"
        android:layout_marginLeft="8dp"
        android:layout_width="48dp"
        android:layout_height="48dp"
        android:alpha="0.54" />
    <LinearLayout
        android:layout_gravity="center_vertical"
        android:layout_marginTop="8dp"
        android:layout_marginBottom="8dp"
        android:layout_marginLeft="16dp"
        android:layout_marginRight="16dp"
        android:orientation="vertical"
        android:layout_width="0dp"
        android:layout_height="wrap_content"
        android:layout_weight="1">
        <TextView
            android:id="@+id/info_title"
            android:text="example"
            android:textColor="@color/primary_text"
            android:layout_width="wrap_content"
            android:layout_height="match_parent"
            android:textSize="16sp" />
        <TextView
            android:id="@+id/info_snippet"
            android:text="example"
            android:textColor="@color/secondary_text"
            android:layout_width="wrap_content"
            android:layout_height="wrap_content"
            android:textSize="14sp" />
    </LinearLayout>
    <ImageView
        android:layout_gravity="center_vertical"
        android:src="@drawable/ic_navigate_next_black"
        android:layout_marginTop="8dp"
        android:layout_marginBottom="8dp"
        android:layout_marginRight="8dp"
        android:layout_width="32dp"
        android:layout_height="32dp"
        android:alpha="0.54" />
</LinearLayout>

IInfoWindowAdapter の実装

IInfoWindowAdapter を実装したクラスを作成します。

吹き出しの中身を置き換えるには、GetInfoContents で View を返します。情報ウィンドウすべてを置き換えるには GetInfoWindow で View を返すようにします。

using Android.Views;
using Android.Widget;
using Android.Gms.Maps;
using Android.Gms.Maps.Model;

public class InfoWindowAdapter : Java.Lang.Object, GoogleMap.IInfoWindowAdapter
{
    private LayoutInflater inflater;

    public InfoWindowAdapter(LayoutInflater inflater)
    {
        this.inflater = inflater;
    }

    public View GetInfoContents(Marker marker)
    {
        var view = inflater.Inflate(Resource.Layout.InfoWindow, null);
        
        var title = view.FindViewById<TextView>(Resource.Id.info_title);
        title.Text = marker.Title;

        var snippet = view.FindViewById<TextView>(Resource.Id.info_snippet);
        snippet.Text = marker.Snippet;

        return view;
    }

    public View GetInfoWindow(Marker marker)
    {
        return null;
    }
}

InfoWindowAdapter の適用

作成した Adapter を、GoogleMap オブジェクトに設定します。

public void OnMapReady(GoogleMap map)
{
    map.SetInfoWindowAdapter(new InfoWindowAdapter(LayoutInflater));
}

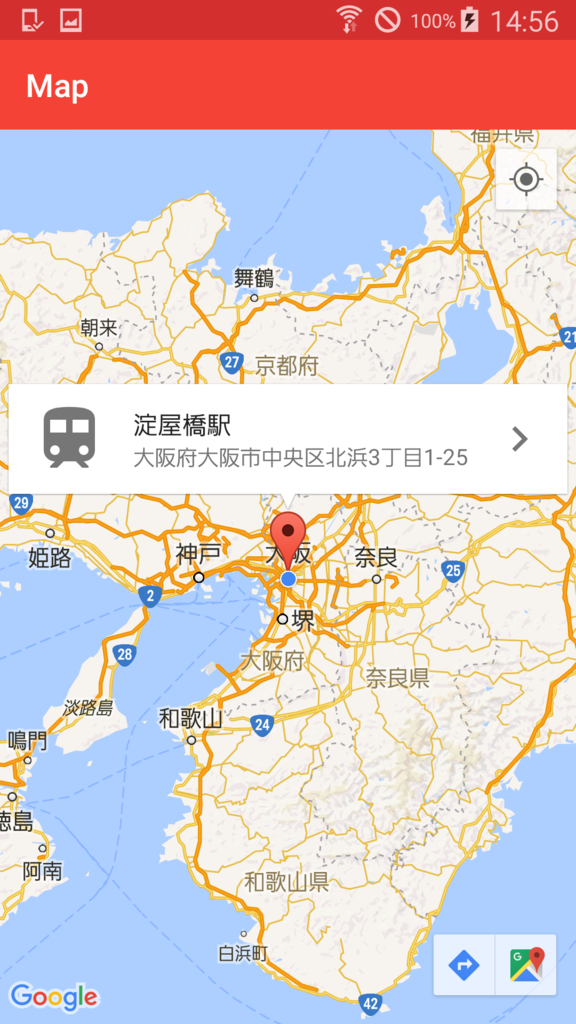
結果

マーカーを追加すると、Adapter で処理した情報ウィンドウが表示されます。

var m = new MarkerOptions();
m.SetPosition(new LatLng(34.6925497, 135.5016865));
m.SetTitle("淀屋橋駅");
m.SetSnippet("大阪府大阪市中央区北浜3丁目1-25");
var marker = map.AddMarker(m);

f:id:jz5_diva:20160421154804p:plain

オマケ1: 情報ウィンドウのタップ時に処理するには

情報ウィンドウがタップされたときに何か処理する場合は、InfoWindowClick イベントを使います。

map.InfoWindowClick += Map_InfoWindowClick;

オマケ2: 情報ウィンドウをコードから表示するには

情報ウィンドウをコードから表示するには、Maker の ShowInfoWindow メソッドを使います。

maker.ShowInfoWindow();