ディーバ Blog

大阪発 C#の会社、株式会社ディーバの Blog です。

Xamarin.Android で Google Maps の表示とマーカー・情報ウィンドウの表示

地図の表示

Xamarin.Android で Google Maps の表示は、Xamarin.Androidで地図を表示するには?(Google Maps使用) - Build Insider などを参考にしてください。

地図の操作

地図を操作するには、IOnMapReadyCallback を実装し、GoogleMap オブジェクトを取得します。

public class MapActivity : Activity, IOnMapReadyCallback
{
    protected override void OnCreate(Bundle bundle)
    {
        base.OnCreate(bundle);

        // MapFragment から GoogleMap の取得
        var mapFrag = (MapFragment)FragmentManager.FindFragmentById(Resource.Id.map);
        mapFrag.GetMapAsync(this);
    }

    public void OnMapReady(GoogleMap map)
    {
        // map を使って操作
        map.MyLocationEnabled = true;
        map.UiSettings.MyLocationButtonEnabled = true;
    }
}

地図の移動

少しだけめんどうです。

var builder = CameraPosition.InvokeBuilder();
builder.Target(new LatLng(34.686564, 135.503155)); // 経緯度
builder.Zoom(8); // ズームレベル
var cameraUpdate = CameraUpdateFactory.NewCameraPosition(builder.Build());
map.MoveCamera(cameraUpdate);

移動アニメーションを行うには、MoveCamera の代わりに AnimateCamera メソッドを使います。

マーカーと情報ウィンドウの表示

デフォルトのマーカーと情報ウィンドウを表示する方法です。

var m = new MarkerOptions();
m.SetPosition(new LatLng(34.686564, 135.503155));
m.SetTitle("株式会社ディーバ");
m.SetSnippet("大阪発 C#の会社");

// マーカー追加
var marker = map.AddMarker(m);

f:id:jz5_diva:20160421151748p:plain

次の記事では、カスタムした情報ウィンドウを表示します。

共通のコードで iOS/Android/UWP のダイアログを表示できる ACR User Dialogs for Xamarin and Windows

ACR User Dialogs for Xamarin and Windows

ACR User Dialogs for Xamarin and Windows を使うと、MvvmCrossMVVM パターンの ViewModel のコード(PCL プロジェクト側)から、ダイアログを表示するコードを簡単に書けます。MvvmCross 用のプラグインもあり MvvmCross のサイトからも紹介されいています

ダイアログ (Alert) だけでなく、ローディング画面なども呼び出せます。機能は次の通り。

  • Action Sheet (multiple choice menu)
  • Alert
  • Confirm
  • Loading
  • Login
  • Progress
  • Prompt
  • Toasts

NuGet からプロジェクトにインストールします。ViewModel 側(PCL プロジェクト)と、View 側の各プラットフォームのプロジェクトそれぞれにインストールします。

公式のサンプルコードは GitHub の examples にあります。

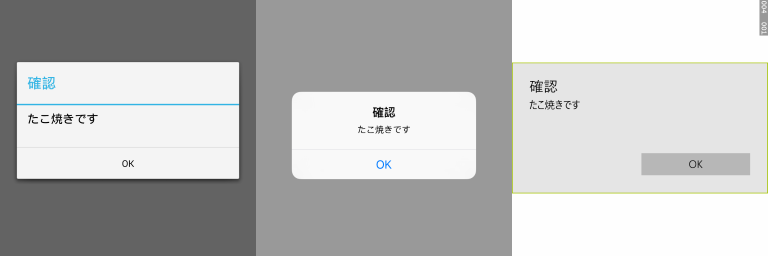
Dialog

using using Acr.UserDialogs;

UserDialogs.Instance.Alert("たこ焼きです", "確認", "OK");

f:id:jz5_diva:20160421102435p:plain

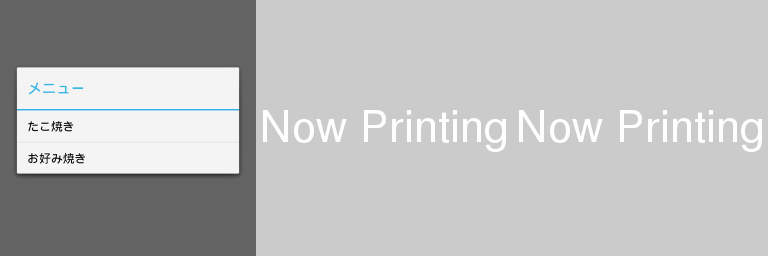
Action Sheet

using using Acr.UserDialogs;

var config = new ActionSheetConfig();
config.Title = "メニュー";
config.Add("たこ焼き", () => {/* Do something */ });
config.Add("お好み焼き", () => {/* Do something */ });
UserDialogs.Instance.ActionSheet(config);

f:id:jz5_diva:20160421103041p:plain

Confirm

using using Acr.UserDialogs;

var config = new ConfirmConfig();
config.Title = "確認";
config.Message = "たこ焼きを購入します";
config.OnConfirm = (result) =>
{
    /* Do something */
};
config.OkText = "購入";
config.CancelText = "キャンセル";
UserDialogs.Instance.Confirm(config);

f:id:jz5_diva:20160421102456p:plain

おわりに

上記以外にももう少し細かなオプションや、非同期呼び出しなども用意されています。使用感として、View 側に一切コードが不要のため手軽で便利ですが、Android ではスタイルを適用できないなど、少しこだわったアプリでは使いづらいところもあります。

Xamarin.Android + MvvmCross でアイコン付きリスト形式の AlertDialog を表示

Xamarin.Android と MvvmCross 4 でリスト形式の AlertDialog を表示します。

リスト形式の AlertDialog

普通のリスト形式の場合。MvvmCross は関係ありません。

f:id:jz5_diva:20160418154254p:plain

var alert = new AlertDialog.Builder(this);
alert.SetTitle("Title");

var items = new string[]
{
    "Item 1",
    "Item 2",
    "Item 3",
};

alert.SetItems(items, (s, a) =>
{
    var selectedItem = items[a.Which];
});

alert.Show();

アイコン付きリスト形式の AlertDialog

f:id:jz5_diva:20160418154259p:plain

AlertDialog の表示

呼び出し部分から。

var alert = new AlertDialog.Builder(this);
alert.SetTitle("Title");

var items = new List<ListItem>()
{
    new ListItem("Item 1", "res:ic_call_black"),
    new ListItem("Item 2", "res:ic_chat_black"),
    new ListItem("Item 3", "res:ic_email_black"),
};

var adapter = new ListAdapter(this, (IMvxAndroidBindingContext)BindingContext);

adapter.ItemsSource = items;

alert.SetAdapter(adapter, (s, a) =>
{
    var selectedItem = items[a.Which];
});

alert.Show();

MvxImageView の ImageUrl にリソース画像を指定するには「res:」を付けます。

リスト項目の View

アイコンとテキストを表示する MvxImageView と TextView を配置した axml ファイルを用意します。ImageUrl と Text プロパティを Binding 指定しています。

<?xml version="1.0" encoding="utf-8"?>
<LinearLayout xmlns:android="http://schemas.android.com/apk/res/android"
    xmlns:local="http://schemas.android.com/apk/res-auto"
    android:orientation="horizontal"
    android:layout_width="match_parent"
    android:layout_height="56dp">
    <MvxImageView
        android:layout_marginTop="8dp"
        android:layout_marginBottom="8dp"
        android:layout_marginLeft="24dp"
        android:layout_width="40dp"
        android:layout_height="40dp"
        local:MvxBind="ImageUrl ImageUrl" />
    <TextView
        android:layout_marginTop="8dp"
        android:layout_marginBottom="8dp"
        android:layout_marginLeft="16dp"
        android:layout_marginRight="24dp"
        android:gravity="center_vertical"
        android:layout_width="0dp"
        android:layout_height="match_parent"
        android:layout_weight="1"
        android:ellipsize="end"
        android:text="example"
        local:MvxBind="Text Text"
        android:textColor="@color/primary_text"
        android:textSize="16sp" />
</LinearLayout>

リスト項目の Class

リストの項目を表すクラスを作ります。

private class ListItem
{
    public string Text { get; set; }

    public string ImageUrl { get; set; }

    public ListItem(string text, string imageUrl)
    {
        this.Text = text;
        this.ImageUrl = imageUrl;
    }
}

カスタム Adapter

カスタム Adapter を作り、GetView 内で作成した View の Resource ID を指定します。

private class ListAdapter : MvxAdapter
{
    public ListAdapter(Context context, IMvxAndroidBindingContext bindingContext) : base(context, bindingContext)
    {
    }

    protected override View GetView(int position, View convertView, ViewGroup parent, int templateId)
    {
        templateId = Resource.Layout.ListItem; // 作成したリスト項目の View
        return base.GetView(position, convertView, parent, templateId);
    }
}