2016/09/08 から、株式会社ディーバ 代表取締役 青柳臣一による連載「Xamarin で作る Android/iOS アプリ」が始まっています。
Xamarin.iOS 透明な NavigationBar と Toolbar
Xamarin に限らず iOS の一般的な話と同じですが、Xamarin.iOS で NavigationBar と Toolbar の背景を透明にします。
背景を透明にするだけでは、NavigationBar の下、Toolbar の上部分に線が表示されるので、それも非表示にします。

public override void ViewWillAppear(bool animated)
{
    base.ViewWillAppear(animated);

    this.NavigationController.NavigationBar.TintColor = UIColor.White;
    this.NavigationController.NavigationBar.TitleTextAttributes = new UIStringAttributes()
    {
        ForegroundColor = UIColor.White
    };
    this.NavigationController.NavigationBar.SetBackgroundImage(new UIImage(), UIBarMetrics.Default); // 背景透明
    this.NavigationController.NavigationBar.ShadowImage = new UIImage(); // 境界線透明

    this.NavigationController.Toolbar.TintColor = UIColor.White;
    this.NavigationController.Toolbar.SetBackgroundImage(new UIImage(), UIToolbarPosition.Any, UIBarMetrics.Default); // 背景透明
    this.NavigationController.Toolbar.ClipsToBounds = true; // 境界線非表示
}
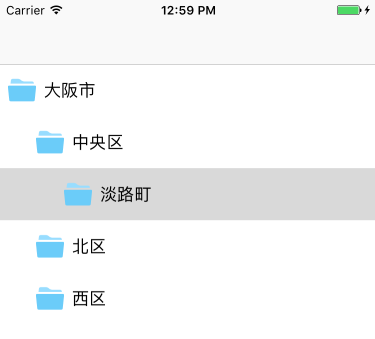
Xamarin.iOS でフォルダー選択の UI (TreeView) を作る
iOS には、階層構造を表現・選択する UI コントロールが提供されていません。
検索すると、Xamarin iOS – Create custom TreeView control for iPad / iPhone « Milen's Blog で実装しているコードがありましたが、きちんと動作していない感じだったので、作って見ました。コードは、diva-osaka/xamarin-ios-treeviewsample にあります。

フォルダーを閉じると、これまで開いていた情報は忘れます(再度 開くと直下の子要素しか表示しません)。
ノートを表すクラス。とりあえず表示と動作に必要なプロパティしかありません。
using System.Collections.Generic;

namespace TreeViewSample
{
    public class TreeNode
    {
        public List<TreeNode> Children { get; set; } = new List<TreeNode>();

        public string Name { get; set; }

        public int Level { get; set; }

        public bool IsExpanded { get; set; }
    }
}
UITableViewController を元に作成。
using Foundation;
using System;
using System.Collections.Generic;
using System.Linq;
using UIKit;

namespace TreeViewSample
{
    public partial class FolderViewController : UITableViewController
    {
        public FolderViewController(IntPtr handle) : base(handle)
        {
        }

        public override void ViewDidLoad()
        {
            base.ViewDidLoad();

            TableView.RowHeight = FolderCell.Height;
            TableView.SeparatorColor = UIColor.Clear;
            TableView.Source = new TreeViewSource(CreateNodes());
        }

        private TreeNode CreateNodes()
        {
            var osaka = new TreeNode { Level = 0, Name = "大阪市" };

            var sub1 = new TreeNode { Level = 1, Name = "中央区" };
            var sub2 = new TreeNode { Level = 1, Name = "北区" };
            var sub3 = new TreeNode { Level = 1, Name = "西区" };

            osaka.Children.Add(sub1);
            osaka.Children.Add(sub2);
            osaka.Children.Add(sub3);

            var sub4 = new TreeNode { Level = 2, Name = "淡路町" };
            sub1.Children.Add(sub4);

            return osaka;
        }

        private class TreeViewSource : UITableViewSource
        {
            private List<TreeNode> Nodes = new List<TreeNode>();

            public TreeViewSource(TreeNode root)
            {
                Nodes.Add(root);
            }

            public override UITableViewCell GetCell(UITableView tableView, NSIndexPath indexPath)
            {
                var cell = tableView.DequeueReusableCell("FolderCell") as FolderCell;
                cell.SetCellContents(Nodes[indexPath.Row]);
                return cell;
            }

            public override nint RowsInSection(UITableView tableview, nint section)
            {
                return Nodes.Count;
            }

            public override void RowSelected(UITableView tableView, NSIndexPath indexPath)
            {
                var selectedNode = Nodes[indexPath.Row];
                var selectedIndex = indexPath.Row;

                if (!selectedNode.IsExpanded)
                {
                    var children = selectedNode.Children;

                    // 開く
                    if (!children.Any())
                    {
                        return;
                    }

                    selectedNode.IsExpanded = true;

                    var indexPaths = new List<NSIndexPath>();
                    foreach (var node in children.Select((Value, Index) => new { Value, Index }))
                    {
                        node.Value.IsExpanded = false;
                        indexPaths.Add(NSIndexPath.FromRowSection(selectedIndex + node.Index + 1, 0));
                    }
                    Nodes.InsertRange(selectedIndex + 1, children);
                    tableView.InsertRows(indexPaths.ToArray(), UITableViewRowAnimation.Automatic);
                }
                else
                {
                    // 閉じる
                    selectedNode.IsExpanded = false;

                    var node = Nodes.Skip(selectedIndex + 1).FirstOrDefault(i => i.Level <= selectedNode.Level);
                    var deleteCount = (node != null) ?
                        Nodes.IndexOf(node) - selectedIndex - 1 :
                        Nodes.Count - selectedIndex - 1;

                    var indexPaths = new List<NSIndexPath>();
                    for (int i = 0; i < deleteCount; i++)
                    {
                        Nodes.RemoveAt(selectedIndex + 1);
                        tableView.DeleteRows(new NSIndexPath[] { NSIndexPath.FromRowSection(selectedIndex + 1, 0) }, UITableViewRowAnimation.Top);
                    }
                }
            }
        }
    }
}
using CoreGraphics;
using Foundation;
using System;
using UIKit;

namespace TreeViewSample
{
    [Register("FolderCell")]
    public class FolderCell : UITableViewCell
    {
        static readonly public int Height = 52;

        private int level;
        private UIImageView imageView;
        private UILabel titleLabel;

        public FolderCell(IntPtr handle) : base(handle)
        {
        }

        void ReleaseDesignerOutlets()
        {
        }

        public void SetCellContents(TreeNode node)
        {
            level = node.Level;

            imageView = new UIImageView
            {
                Image = UIImage.FromFile("Folder.png"),
                ContentMode = UIViewContentMode.Left
            };
            imageView.SizeToFit();

            titleLabel = new UILabel()
            {
                TextColor = UIColor.Black,
                BackgroundColor = UIColor.Clear,
                Text = node.Name
            };
            titleLabel.SizeToFit();

            foreach (var v in ContentView.Subviews)
            {
                v.RemoveFromSuperview();
            }

            ContentView.AddSubviews(imageView, titleLabel);
        }

        public override void LayoutSubviews()
        {
            base.LayoutSubviews();

            var indent = 28;
            var margin = 8;

            var imageFrame = new CGRect(level * indent + margin, 0, 28.0f, Height);
            imageView.Frame = imageFrame;

            var titleFrame = new CGRect(level * indent + imageFrame.Width + margin * 2, 0, (float)titleLabel.Bounds.Width, Height);
            titleLabel.Frame = titleFrame;
        }
    }
}
UICollectionViewController の Cell サイズを実行時に変更
Xamarin.iOS のUICollectionViewController を継承した ViewController 使用時、コードで Cell サイズを動的に変更する方法です。
Layout プロパティの ItemSize を設定します。
public partial class SampleViewController : UICollectionViewController
{
    public override void ViewDidLoad()
    {
        base.ViewDidLoad();

        var w = CollectionView.Frame.Width / 3;
        (Layout as UICollectionViewFlowLayout).ItemSize = new CGSize(w, w);
    }
}
わんくま同盟 名古屋勉強会 #38 参加と、いらすとやのラズパイ素材 | Xamarin、Windows 10 IoT など
2016/5/21 開催の わんくま同盟 名古屋勉強会 #38 に、ぶらりと参加してきました。参加人数は、20名程度。場所は、名古屋市港生涯学習センター。

C# + Windows10 IoT Core で学ぶ IoT by くぅさん
IoT はどんなものから IoT 話題など。Raspberry Pi 2 で動く Windows 10 IoT Core 上で UWP の UI ありのアプリが 動くデモも披露。
スライドでは いらすとや の素材を利用していましたが、Raspberry Pi のイラストが無かったため、アップルパイの素材で代用していました。

リクエストが叶ったのか、Raspberry Pi の素材も勉強会後に登場しましたね。
シングルボードコンピュータのイラスト https://t.co/ftVGiRKBUn
— いらすとや (@irasutoya) 2016年5月22日
Xamarin で始める iOS / Android アプリ開発 by biac さん
わんくま名古屋#38 に参加いただいた皆さま、本日はありがとうございました♪
— 山本康彦@BluewaterSoft (@biac) 2016年5月21日
「#Xamarin で始める iOS/Androidアプリ開発」の資料を公開しました。 https://t.co/amsoIe3nKO#wankuma
Xamarin.Forms の Hello world。
はじめに、発売されたばかりの C#プログラマーのための 基礎からわかるLINQマジック! に関連して LINQ の話題。会場から多数質問もあり、盛り上がりました。LINQ を使いメソッドチェーンで書くのと、以前のように for ループで書くのとどちらが早いのかなどの疑問も読めば解決するようですよ。

- 作者: 山本康彦
- 出版社/メーカー: 技術評論社
- 発売日: 2016/05/12
- メディア: 単行本(ソフトカバー)
- この商品を含むブログ (2件) を見る
Xamarin の内容は、Xamarin と Xamarin.Forms の簡単な紹介と、実際に Android エミュレーターと、UWP アプリ、Windows Phone 実機デモを披露。
わんくま Azure 移行するぞ。大作戦その1 by 中博俊さん
(資料なし)
2000年初期から続く わんくま同盟 のサイトを Azure に移行中という話。当時は ASP.NET が動くレンタルサーバーを探すのも苦労したけど、今は Azure など手軽に使える時代になったとのこと(わんくま同盟のサーバーは自宅で運用)。
わんくま同盟のサイトは、Blog や掲示板、勉強会の登録やリマインダー、メーリングリストなど雑多な構成で、徐々に置き換えしているようです。Microsoft Azure は多数のサービスがあり、どれを利用するなども紹介。
セッション用のノート PC を忘れたため、借りたノート PC に Azure Powershell 等をインストールして実演しながら紹介。
さらっと学ぶ DevOps by じぇいさん
(資料なし)
50分セッションが30分で終了したため、20分は運営の手を借りながら、DevOps とは何かを少しディスカッション。
DevOpsとは何か? そのツールと組織文化、アジャイルとの違い - Build Insider の記事が良いようです。
MvvmCross + Xamarin.Android でスプラッシュスクリーンを表示
MvvmCross (現在 v4.14)をセットアップした Xamarin.Android プロジェクトは、はじめからスプラッシュスクリーンが実装されています。
ただ、セットアップ時に配置されている splash.png を差し替えただけでは、Android 画面比率に合わせて画像がゆがんで表示されてしまうため、正しく表示できるよう修正します。
初期状態
はじめに、スプラッシュスクリーンに関するファイルは次の通り。
- SplashScreen.cs
- Resources/drawable/splash.png
- Resources/layout/SplashScreen.axml
- Resources/values/SplashStyle.xml
MvxSplashScreenActivity を継承した SplashScreen クラスが最初に呼び出されます。ここで SplashScreen.axml にある Theme.Splash スタイルと、SplashStyle.xml 画面を指定しています。
namespace MapApp.Droid
{
    [Activity(
        Label = "Sample"
        , MainLauncher = true
        , Icon = "@mipmap/icon"
        , Theme = "@style/Theme.Splash"
        , NoHistory = true
        , ScreenOrientation = ScreenOrientation.Portrait)]
    public class SplashScreen : MvxSplashScreenActivity
    {
        public SplashScreen()
            : base(Resource.Layout.SplashScreen)
        {
        }
    }
}
SplashStyle.xml で、splash.png を背景として指定しています。
<resources>
  <style name="Theme.Splash" parent="android:Theme">
    <item name="android:windowBackground">@drawable/splash</item>
    <item name="android:windowNoTitle">true</item>
  </style>
</resources>
SplashScreen.axml では、Loading... のテキストを表示するよう記述しています。
<LinearLayout xmlns:android="http://schemas.android.com/apk/res/android"
    android:orientation="vertical"
    android:layout_width="fill_parent"
    android:layout_height="fill_parent">
    <TextView
        android:layout_width="fill_parent"
        android:layout_height="wrap_content"
        android:text="Loading...." />
</LinearLayout>
アプリを起動すると、splash.png が表示され、続いて SplashScreen.axml のテキストが表示されます。
問題点
splash.png が、画面比率に合わせてゆがんで表示されます。
9-patch 画像に置き換えても、SplashScreen.axml のテキストが表示されるときに背景画像がゆがみます。
解決策
SplashStyle.xml で指定する背景を、画像ファイルではなく、次のような xml ファイルに変えます。
SplashLayer.xml という名前で drawable フォルダーに保存します。
<?xml version="1.0" encoding="utf-8"?>
<layer-list xmlns:android="http://schemas.android.com/apk/res/android">
  <item>
    <shape
        android:shape="rectangle">
      <solid
          android:color="@color/primary" />
    </shape>
  </item>
  <item>
    <bitmap
          android:gravity="center"
          android:src="@drawable/splash" />
  </item>
</layer-list>
SplashStyle.xml を編集し、@drawable/splashlayer を指定します。
<resources>
  <style name="Theme.Splash" parent="android:Theme">
    <item name="android:windowBackground">@drawable/splashlayer</item>
    <item name="android:windowNoTitle">true</item>
  </style>
</resources>
以上です。
Xamarin.Android の Google Maps でカスタムした情報ウィンドウの表示
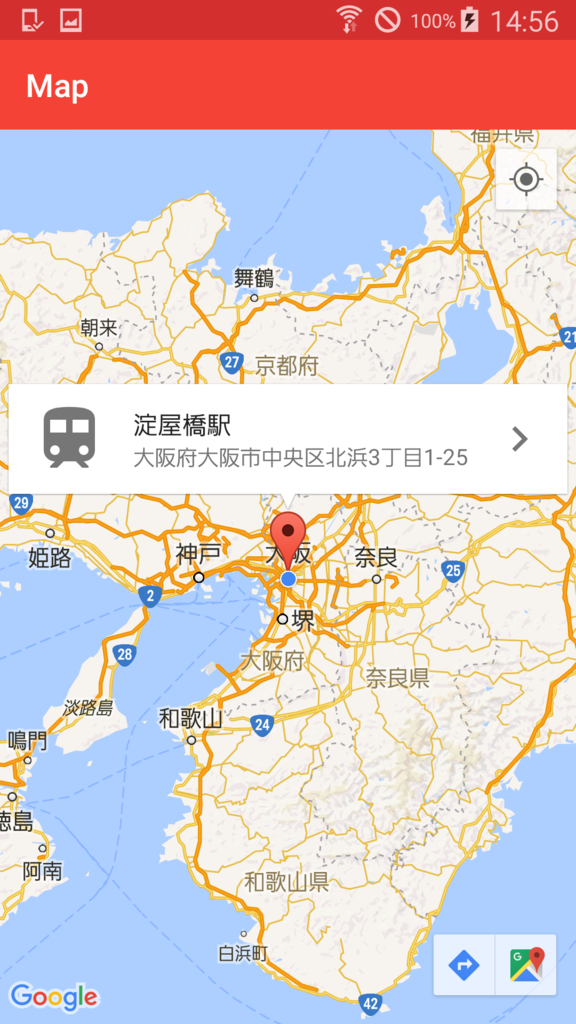
Xamarin.Android の Google Maps で、独自の情報ウィンドウ (info Window) を表示します。
Google Maps の表示 はこちらから。
カスタムした情報ウィンドウの表示
View の定義
axml ファイルで定義した View を情報ウィンドウとして表示します。
<?xml version="1.0" encoding="utf-8"?>
<LinearLayout xmlns:android="http://schemas.android.com/apk/res/android"
    android:orientation="horizontal"
    android:layout_width="match_parent"
    android:layout_height="match_parent">
    <ImageView
        android:layout_gravity="center_vertical"
        android:src="@drawable/ic_train_black"
        android:layout_marginTop="8dp"
        android:layout_marginBottom="8dp"
        android:layout_marginLeft="8dp"
        android:layout_width="48dp"
        android:layout_height="48dp"
        android:alpha="0.54" />
    <LinearLayout
        android:layout_gravity="center_vertical"
        android:layout_marginTop="8dp"
        android:layout_marginBottom="8dp"
        android:layout_marginLeft="16dp"
        android:layout_marginRight="16dp"
        android:orientation="vertical"
        android:layout_width="0dp"
        android:layout_height="wrap_content"
        android:layout_weight="1">
        <TextView
            android:id="@+id/info_title"
            android:text="example"
            android:textColor="@color/primary_text"
            android:layout_width="wrap_content"
            android:layout_height="match_parent"
            android:textSize="16sp" />
        <TextView
            android:id="@+id/info_snippet"
            android:text="example"
            android:textColor="@color/secondary_text"
            android:layout_width="wrap_content"
            android:layout_height="wrap_content"
            android:textSize="14sp" />
    </LinearLayout>
    <ImageView
        android:layout_gravity="center_vertical"
        android:src="@drawable/ic_navigate_next_black"
        android:layout_marginTop="8dp"
        android:layout_marginBottom="8dp"
        android:layout_marginRight="8dp"
        android:layout_width="32dp"
        android:layout_height="32dp"
        android:alpha="0.54" />
</LinearLayout>
IInfoWindowAdapter の実装
IInfoWindowAdapter を実装したクラスを作成します。
吹き出しの中身を置き換えるには、GetInfoContents で View を返します。情報ウィンドウすべてを置き換えるには GetInfoWindow で View を返すようにします。
using Android.Views;
using Android.Widget;
using Android.Gms.Maps;
using Android.Gms.Maps.Model;

public class InfoWindowAdapter : Java.Lang.Object, GoogleMap.IInfoWindowAdapter
{
    private LayoutInflater inflater;

    public InfoWindowAdapter(LayoutInflater inflater)
    {
        this.inflater = inflater;
    }

    public View GetInfoContents(Marker marker)
    {
        var view = inflater.Inflate(Resource.Layout.InfoWindow, null);

        var title = view.FindViewById<TextView>(Resource.Id.info_title);
        title.Text = marker.Title;

        var snippet = view.FindViewById<TextView>(Resource.Id.info_snippet);
        snippet.Text = marker.Snippet;

        return view;
    }

    public View GetInfoWindow(Marker marker)
    {
        return null;
    }
}
InfoWindowAdapter の適用
作成した Adapter を、GoogleMap オブジェクトに設定します。
public void OnMapReady(GoogleMap map)
{
    map.SetInfoWindowAdapter(new InfoWindowAdapter(LayoutInflater));
}
結果
マーカーを追加すると、Adapter で処理した情報ウィンドウが表示されます。
var m = new MarkerOptions();
m.SetPosition(new LatLng(34.6925497, 135.5016865));
m.SetTitle("淀屋橋駅");
m.SetSnippet("大阪府大阪市中央区北浜3丁目1-25");
var marker = map.AddMarker(m);

オマケ1: 情報ウィンドウのタップ時に処理するには
情報ウィンドウがタップされたときに何か処理する場合は、InfoWindowClick イベントを使います。
map.InfoWindowClick += Map_InfoWindowClick;
オマケ2: 情報ウィンドウをコードから表示するには
情報ウィンドウをコードから表示するには、Maker の ShowInfoWindow メソッドを使います。
maker.ShowInfoWindow();