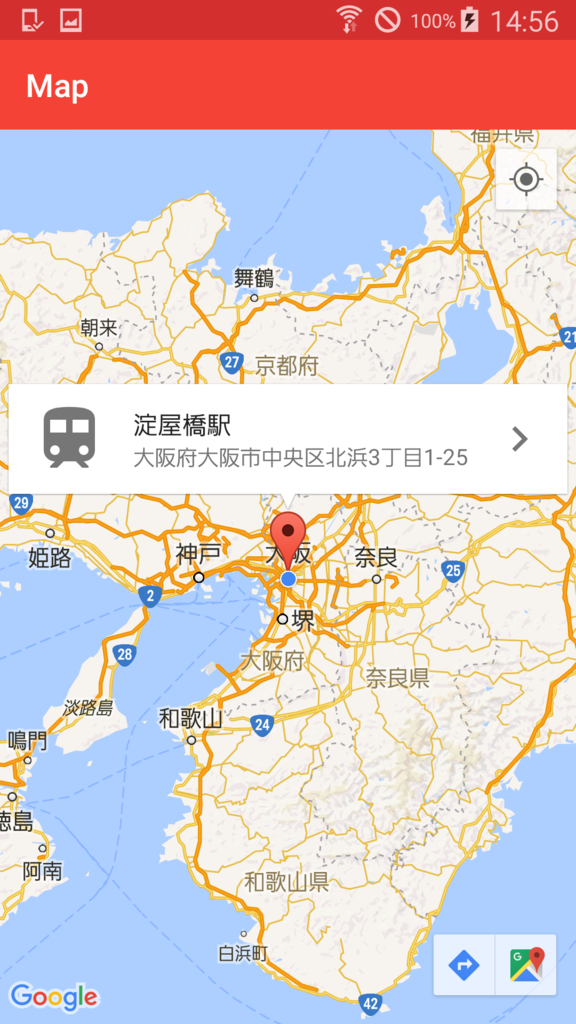
Xamarin.Android の Google Maps で、独自の情報ウィンドウ (info Window) を表示します。
Google Maps の表示 はこちらから。
カスタムした情報ウィンドウの表示
View の定義
axml ファイルで定義した View を情報ウィンドウとして表示します。
xml version="1.0" encoding="utf-8"
<LinearLayout xmlnsandroid="http://schemas.android.com/apk/res/android"
androidorientation="horizontal"
androidlayout_width="match_parent"
androidlayout_height="match_parent">
<ImageView
androidlayout_gravity="center_vertical"
androidsrc="@drawable/ic_train_black"
androidlayout_marginTop="8dp"
androidlayout_marginBottom="8dp"
androidlayout_marginLeft="8dp"
androidlayout_width="48dp"
androidlayout_height="48dp"
androidalpha="0.54" />
<LinearLayout
androidlayout_gravity="center_vertical"
androidlayout_marginTop="8dp"
androidlayout_marginBottom="8dp"
androidlayout_marginLeft="16dp"
androidlayout_marginRight="16dp"
androidorientation="vertical"
androidlayout_width="0dp"
androidlayout_height="wrap_content"
androidlayout_weight="1">
<TextView
androidid="@+id/info_title"
androidtext="example"
androidtextColor="@color/primary_text"
androidlayout_width="wrap_content"
androidlayout_height="match_parent"
androidtextSize="16sp" />
<TextView
androidid="@+id/info_snippet"
androidtext="example"
androidtextColor="@color/secondary_text"
androidlayout_width="wrap_content"
androidlayout_height="wrap_content"
androidtextSize="14sp" />
</LinearLayout>
<ImageView
androidlayout_gravity="center_vertical"
androidsrc="@drawable/ic_navigate_next_black"
androidlayout_marginTop="8dp"
androidlayout_marginBottom="8dp"
androidlayout_marginRight="8dp"
androidlayout_width="32dp"
androidlayout_height="32dp"
androidalpha="0.54" />
</LinearLayout>
IInfoWindowAdapter の実装
IInfoWindowAdapter を実装したクラスを作成します。
吹き出しの中身を置き換えるには、GetInfoContents で View を返します。情報ウィンドウすべてを置き換えるには GetInfoWindow で View を返すようにします。
using Android.Views;
using Android.Widget;
using Android.Gms.Maps;
using Android.Gms.Maps.Model;

public class InfoWindowAdapter : Java.Lang.Object, GoogleMap.IInfoWindowAdapter
{
    private LayoutInflater inflater;

    public InfoWindowAdapter(LayoutInflater inflater)
    {
        this.inflater = inflater;
    }

    public View GetInfoContents(Marker marker)
    {
        var view = inflater.Inflate(Resource.Layout.InfoWindow, null);

        var title = view.FindViewById<TextView>(Resource.Id.info_title);
        title.Text = marker.Title;

        var snippet = view.FindViewById<TextView>(Resource.Id.info_snippet);
        snippet.Text = marker.Snippet;

        return view;
    }

    public View GetInfoWindow(Marker marker)
    {
        return null;
    }
}
InfoWindowAdapter の適用
作成した Adapter を、GoogleMap オブジェクトに設定します。
public void OnMapReady(GoogleMap map)
{
    map.SetInfoWindowAdapter(new InfoWindowAdapter(LayoutInflater));
}
結果
マーカーを追加すると、Adapter で処理した情報ウィンドウが表示されます。
var m = new MarkerOptions();
m.SetPosition(new LatLng(34.6925497, 135.5016865));
m.SetTitle("淀屋橋駅");
m.SetSnippet("大阪府大阪市中央区北浜3丁目1-25");
var marker = map.AddMarker(m);

オマケ1: 情報ウィンドウのタップ時に処理するには
情報ウィンドウがタップされたときに何か処理する場合は、InfoWindowClick イベントを使います。
map.InfoWindowClick += Map_InfoWindowClick;
オマケ2: 情報ウィンドウをコードから表示するには
情報ウィンドウをコードから表示するには、Maker の ShowInfoWindow メソッドを使います。
maker.ShowInfoWindow();

