ディーバ Blog

大阪発 C#の会社、株式会社ディーバの Blog です。

わんくま同盟 名古屋勉強会 #38 参加と、いらすとやのラズパイ素材 | Xamarin、Windows 10 IoT など

2016/5/21 開催の わんくま同盟 名古屋勉強会 #38 に、ぶらりと参加してきました。参加人数は、20名程度。場所は、名古屋市港生涯学習センター。

f:id:jz5_diva:20160523112943j:plain

C# + Windows10 IoT Core で学ぶ IoT by くぅさん

IoT はどんなものから IoT 話題など。Raspberry Pi 2 で動く Windows 10 IoT Core 上で UWP の UI ありのアプリが 動くデモも披露。

スライドでは いらすとや の素材を利用していましたが、Raspberry Pi のイラストが無かったため、アップルパイの素材で代用していました。

f:id:jz5_diva:20160523110455p:plain

リクエストが叶ったのか、Raspberry Pi の素材も勉強会後に登場しましたね。

Xamarin で始める iOS / Android アプリ開発 by biac さん

Xamarin.Forms の Hello world。

はじめに、発売されたばかりの C#プログラマーのための 基礎からわかるLINQマジック! に関連して LINQ の話題。会場から多数質問もあり、盛り上がりました。LINQ を使いメソッドチェーンで書くのと、以前のように for ループで書くのとどちらが早いのかなどの疑問も読めば解決するようですよ。

C#プログラマーのための 基礎からわかるLINQマジック!

C#プログラマーのための 基礎からわかるLINQマジック!

Xamarin の内容は、Xamarin と Xamarin.Forms の簡単な紹介と、実際に Android エミュレーターと、UWP アプリ、Windows Phone 実機デモを披露。

わんくま Azure 移行するぞ。大作戦その1 by 中博俊さん

(資料なし)

2000年初期から続く わんくま同盟 のサイトを Azure に移行中という話。当時は ASP.NET が動くレンタルサーバーを探すのも苦労したけど、今は Azure など手軽に使える時代になったとのこと(わんくま同盟のサーバーは自宅で運用)。

わんくま同盟のサイトは、Blog や掲示板、勉強会の登録やリマインダー、メーリングリストなど雑多な構成で、徐々に置き換えしているようです。Microsoft Azure は多数のサービスがあり、どれを利用するなども紹介。

セッション用のノート PC を忘れたため、借りたノート PC に Azure Powershell 等をインストールして実演しながら紹介。

さらっと学ぶ DevOps by じぇいさん

(資料なし)

50分セッションが30分で終了したため、20分は運営の手を借りながら、DevOps とは何かを少しディスカッション。

DevOpsとは何か? そのツールと組織文化、アジャイルとの違い - Build Insider の記事が良いようです。

MvvmCross + Xamarin.Android でスプラッシュスクリーンを表示

MvvmCross (現在 v4.14)をセットアップした Xamarin.Android プロジェクトは、はじめからスプラッシュスクリーンが実装されています。

ただ、セットアップ時に配置されている splash.png を差し替えただけでは、Android 画面比率に合わせて画像がゆがんで表示されてしまうため、正しく表示できるよう修正します。

初期状態

はじめに、スプラッシュスクリーンに関するファイルは次の通り。

  • SplashScreen.cs
  • Resources/drawable/splash.png
  • Resources/layout/SplashScreen.axml
  • Resources/values/SplashStyle.xml

MvxSplashScreenActivity を継承した SplashScreen クラスが最初に呼び出されます。ここで SplashScreen.axml にある Theme.Splash スタイルと、SplashStyle.xml 画面を指定しています。

namespace MapApp.Droid
{
    [Activity(
        Label = "Sample"
        , MainLauncher = true
        , Icon = "@mipmap/icon"
        , Theme = "@style/Theme.Splash"
        , NoHistory = true
        , ScreenOrientation = ScreenOrientation.Portrait)]
    public class SplashScreen : MvxSplashScreenActivity
    {
        public SplashScreen()
            : base(Resource.Layout.SplashScreen)
        {
        }
    }
}

SplashStyle.xml で、splash.png を背景として指定しています。

<resources>
  <style name="Theme.Splash" parent="android:Theme">
    <item name="android:windowBackground">@drawable/splash</item>
    <item name="android:windowNoTitle">true</item>
  </style>
</resources>

SplashScreen.axml では、Loading... のテキストを表示するよう記述しています。

<LinearLayout xmlns:android="http://schemas.android.com/apk/res/android"
    android:orientation="vertical"
    android:layout_width="fill_parent"
    android:layout_height="fill_parent">
    <TextView
        android:layout_width="fill_parent"
        android:layout_height="wrap_content"
        android:text="Loading...." />
</LinearLayout>

アプリを起動すると、splash.png が表示され、続いて SplashScreen.axml のテキストが表示されます。

問題点

splash.png が、画面比率に合わせてゆがんで表示されます。

9-patch 画像に置き換えても、SplashScreen.axml のテキストが表示されるときに背景画像がゆがみます。

解決策

SplashStyle.xml で指定する背景を、画像ファイルではなく、次のような xml ファイルに変えます。

SplashLayer.xml という名前で drawable フォルダーに保存します。

<?xml version="1.0" encoding="utf-8"?>
<layer-list xmlns:android="http://schemas.android.com/apk/res/android">
  <item>
    <shape
        android:shape="rectangle">
      <solid
          android:color="@color/primary" />
    </shape>
  </item>
  <item>
    <bitmap
          android:gravity="center"
          android:src="@drawable/splash" />
  </item>
</layer-list>

SplashStyle.xml を編集し、@drawable/splashlayer を指定します。

<resources>
  <style name="Theme.Splash" parent="android:Theme">
    <item name="android:windowBackground">@drawable/splashlayer</item>
    <item name="android:windowNoTitle">true</item>
  </style>
</resources>

以上です。

MacBook を立てる台で肩こりが改善した(らしい)

ディスプレイの上端を目線の高さにすると、下を向いて猫背にならず、肩こりが改善するらしい。

隣の人が、MacBook のスタンドで実践していて、実際 楽になったとのこと。

f:id:jz5_diva:20160513130028j:plain

使っているのはこれ。

ただ、ドライアイを避けるためには、視線を下げて作業すると良いという話もあるので、ドライアイとトレードオフかもしれない。

f:id:jz5_diva:20160513131602g:plain

CAD-107【CADデスク】21″CRT傾斜型。眼精疲労を低減する効果あり。 - サンワサプライ株式会社

C# は「1クラス500行・1メソッド50行」なのか

経緯と結論

以下のツイートを見かけました。

C# のコーディングガイドラインとして「1クラス500行・1メソッド50行」を見かけたというツイートと、その出所を知りたいというツイート。既に、ツイート元の方は、間違いであった とツイートしています。

しかし検索すると、近しい C# のガイドラインは存在します。が、現在 まったく従う必要はないでしょう。C# のコーディング規則 には「C# 言語仕様では、コーディング標準が定義されていません。」とあります。

C# Coding Standard

それらしい記述は、「Programming .NET Components (O'Reilly Media, 著者 Juval Lowy)」の Appendix C# Coding Standard - Codeing Practices に見つかります。

Programming .NET Components: Design and Build .NET Applications Using Component-Oriented Programming

Programming .NET Components: Design and Build .NET Applications Using Component-Oriented Programming

内容は、Google ブックス から閲覧できます。IDesign からも Coding Standard 部分のみ少し新しい内容がダウンロードできます。

該当箇所はこちら。

  • Avoid files with more than 500 lines (excluding machine-generated code).
  • Avoid methods with more than 25 lines.

500行を超えるファイルを避ける・25行を超えるメソッドを避けるという内容で少し異なりますが、1ファイル1クラスとする記載もあり500行に関しては同義です。

また、2003年に C# 1.1 用にこの Coding Standard を発行し、C# のデファクトスタンダードとなったとも書いています。

Juval Lowy 氏は、Microsoft Regional Director を務め(社員ではない)、MSDN Library にいくつか記事も掲載されています。現在は見つけられませんが、当時は Microsoft 公式または公式に近いところから、この Coding Standard も参照できたかもしれません。

Xamarin.Android の Google Maps でカスタムした情報ウィンドウの表示

Xamarin.Android の Google Maps で、独自の情報ウィンドウ (info Window) を表示します。

Google Maps の表示 はこちらから。

カスタムした情報ウィンドウの表示

View の定義

axml ファイルで定義した View を情報ウィンドウとして表示します。

<?xml version="1.0" encoding="utf-8"?>
<LinearLayout xmlns:android="http://schemas.android.com/apk/res/android"
    android:orientation="horizontal"
    android:layout_width="match_parent"
    android:layout_height="match_parent">
    <ImageView
        android:layout_gravity="center_vertical"
        android:src="@drawable/ic_train_black"
        android:layout_marginTop="8dp"
        android:layout_marginBottom="8dp"
        android:layout_marginLeft="8dp"
        android:layout_width="48dp"
        android:layout_height="48dp"
        android:alpha="0.54" />
    <LinearLayout
        android:layout_gravity="center_vertical"
        android:layout_marginTop="8dp"
        android:layout_marginBottom="8dp"
        android:layout_marginLeft="16dp"
        android:layout_marginRight="16dp"
        android:orientation="vertical"
        android:layout_width="0dp"
        android:layout_height="wrap_content"
        android:layout_weight="1">
        <TextView
            android:id="@+id/info_title"
            android:text="example"
            android:textColor="@color/primary_text"
            android:layout_width="wrap_content"
            android:layout_height="match_parent"
            android:textSize="16sp" />
        <TextView
            android:id="@+id/info_snippet"
            android:text="example"
            android:textColor="@color/secondary_text"
            android:layout_width="wrap_content"
            android:layout_height="wrap_content"
            android:textSize="14sp" />
    </LinearLayout>
    <ImageView
        android:layout_gravity="center_vertical"
        android:src="@drawable/ic_navigate_next_black"
        android:layout_marginTop="8dp"
        android:layout_marginBottom="8dp"
        android:layout_marginRight="8dp"
        android:layout_width="32dp"
        android:layout_height="32dp"
        android:alpha="0.54" />
</LinearLayout>

IInfoWindowAdapter の実装

IInfoWindowAdapter を実装したクラスを作成します。

吹き出しの中身を置き換えるには、GetInfoContents で View を返します。情報ウィンドウすべてを置き換えるには GetInfoWindow で View を返すようにします。

using Android.Views;
using Android.Widget;
using Android.Gms.Maps;
using Android.Gms.Maps.Model;

public class InfoWindowAdapter : Java.Lang.Object, GoogleMap.IInfoWindowAdapter
{
    private LayoutInflater inflater;

    public InfoWindowAdapter(LayoutInflater inflater)
    {
        this.inflater = inflater;
    }

    public View GetInfoContents(Marker marker)
    {
        var view = inflater.Inflate(Resource.Layout.InfoWindow, null);
        
        var title = view.FindViewById<TextView>(Resource.Id.info_title);
        title.Text = marker.Title;

        var snippet = view.FindViewById<TextView>(Resource.Id.info_snippet);
        snippet.Text = marker.Snippet;

        return view;
    }

    public View GetInfoWindow(Marker marker)
    {
        return null;
    }
}

InfoWindowAdapter の適用

作成した Adapter を、GoogleMap オブジェクトに設定します。

public void OnMapReady(GoogleMap map)
{
    map.SetInfoWindowAdapter(new InfoWindowAdapter(LayoutInflater));
}

結果

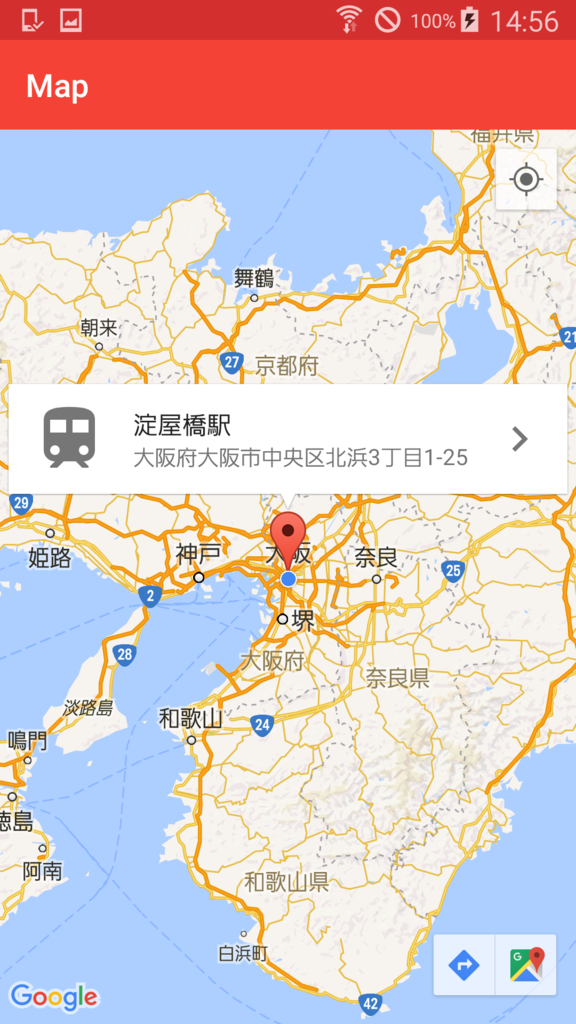
マーカーを追加すると、Adapter で処理した情報ウィンドウが表示されます。

var m = new MarkerOptions();
m.SetPosition(new LatLng(34.6925497, 135.5016865));
m.SetTitle("淀屋橋駅");
m.SetSnippet("大阪府大阪市中央区北浜3丁目1-25");
var marker = map.AddMarker(m);

f:id:jz5_diva:20160421154804p:plain

オマケ1: 情報ウィンドウのタップ時に処理するには

情報ウィンドウがタップされたときに何か処理する場合は、InfoWindowClick イベントを使います。

map.InfoWindowClick += Map_InfoWindowClick;

オマケ2: 情報ウィンドウをコードから表示するには

情報ウィンドウをコードから表示するには、Maker の ShowInfoWindow メソッドを使います。

maker.ShowInfoWindow();

Xamarin.Android で Google Maps の表示とマーカー・情報ウィンドウの表示

地図の表示

Xamarin.Android で Google Maps の表示は、Xamarin.Androidで地図を表示するには?(Google Maps使用) - Build Insider などを参考にしてください。

地図の操作

地図を操作するには、IOnMapReadyCallback を実装し、GoogleMap オブジェクトを取得します。

public class MapActivity : Activity, IOnMapReadyCallback
{
    protected override void OnCreate(Bundle bundle)
    {
        base.OnCreate(bundle);

        // MapFragment から GoogleMap の取得
        var mapFrag = (MapFragment)FragmentManager.FindFragmentById(Resource.Id.map);
        mapFrag.GetMapAsync(this);
    }

    public void OnMapReady(GoogleMap map)
    {
        // map を使って操作
        map.MyLocationEnabled = true;
        map.UiSettings.MyLocationButtonEnabled = true;
    }
}

地図の移動

少しだけめんどうです。

var builder = CameraPosition.InvokeBuilder();
builder.Target(new LatLng(34.686564, 135.503155)); // 経緯度
builder.Zoom(8); // ズームレベル
var cameraUpdate = CameraUpdateFactory.NewCameraPosition(builder.Build());
map.MoveCamera(cameraUpdate);

移動アニメーションを行うには、MoveCamera の代わりに AnimateCamera メソッドを使います。

マーカーと情報ウィンドウの表示

デフォルトのマーカーと情報ウィンドウを表示する方法です。

var m = new MarkerOptions();
m.SetPosition(new LatLng(34.686564, 135.503155));
m.SetTitle("株式会社ディーバ");
m.SetSnippet("大阪発 C#の会社");

// マーカー追加
var marker = map.AddMarker(m);

f:id:jz5_diva:20160421151748p:plain

次の記事では、カスタムした情報ウィンドウを表示します。

UWP アプリで Google Maps の表示

UWP (Universal Windows Platform) で Google Maps を表示するには、WebView と Google Maps JavaScript API を使うしかないようです。

WebView の配置

XAML に WebView を配置します。

<Grid Background="{ThemeResource ApplicationPageBackgroundThemeBrush}">
    <WebView x:Name="webView"></WebView>
</Grid>

地図を表示する HTML ファイル の作成

HTML ファイルとして Google Maps を表示するコードを記述します。

プロジェクトに HTML ファイルを追加し(ここでは map.html)、ファイルのビルドアクションは「コンテンツ」を選び、「出力ディレクトリにコピー」は、コピーする項目を選びます。

また、Google Developer Console から、Google Maps JavaScript API を有効にし、ブラウザーキーを取得します。

<!DOCTYPE html>
<html lang="ja" xmlns="http://www.w3.org/1999/xhtml">
<head>
    <meta name="viewport" content="initial-scale=1.0, user-scalable=no" />
    <meta charset="utf-8" />
    <title>Map</title>
    <style type="text/css">
        html, body {
            height: 100%;
            margin: 0;
            padding: 0;
        }

        #map {
            height: 100%;
        }
    </style>
</head>
<body>
    <div id="map"></div>
    <script type="text/javascript">

        var map;
        function initMap() {
            map = new google.maps.Map(document.getElementById('map'), {
                center: { lat: 34.686564, lng: 135.503155 },
                zoom: 8
            });
        }

        function setCenter(lat, lng) {
            var latLng = new google.maps.LatLng(lat, lng);
            map.setCenter(latLng);
        }
    </script>
    <script async defer
            src="https://maps.googleapis.com/maps/api/js?key=**API_KEY**&callback=initMap">
    </script>
</body>
</html>

HTML ファイルを読み込み WebView に表示

プロジェクトに追加した HTML ファイルを読み込み、WebView に表示します。

string html;

var file = await StorageFile.GetFileFromApplicationUriAsync(new Uri("ms-appx:///map.html"));
using (var st = (await file.OpenReadAsync()).AsStream())
using (var r = new StreamReader(st))
{
    html = await r.ReadToEndAsync();
}
            
// 文字列から WevView に表示する内容を設定
webView.NavigateToString(html);

実行結果

f:id:jz5_diva:20160419234223p:plain

Windows 10 Mobile MADOSMAでは、かなりストレスのある操作性でした。

地図が表示されず、map.html を直接 Web ブラウザーで開いて「このページでは Google マップの要素を表示できませんでした。」と表示される場合は、Google Developer Console で JavaScript API を有効にしているか確認しましょう。

JavaScript と C# のコード間でのやりとり

C# → JavaScript

JavaScript の関数を WebView 経由で呼び出して地図の操作ができます。

await webView.InvokeScriptAsync("setCenter", new string[] { "34.686564", "135.503155" });

JavaScript → C#

C# で JavaScript からの呼び出しを受けるには、WebView.ScriptNotify を使います。

webView.ScriptNotify += (sender, args) =>
{
    System.Diagnostics.Debug.WriteLine(args.Value);
};

JavaScript 側は、window.external.notify で値を送ります。

window.external.notify("value");